6.34. How to Assign and Configure Dejavoo License in SambaPOS
This detailed step-by-step guide will walk you through assigning and configuring the Dejavoo payment module in SambaPOS.
Follow each section carefully to ensure proper setup.
Step 1: Assign a Dejavoo License
1.1. Log in to the SambaPOS License Control Panel (CP)
– Open a browser and go to https://cp.sambapos.com/signin
– Enter your credentials (username and password) to log in.
1.2. Assign the Dejavoo License
– Navigate to the License Management section.
– Locate the option for Dejavoo license and assign it to your account or demo account.
1.3. Important Notes:
– The Dejavoo license is free of charge, so assigning it will not incur additional fees.
– Verify that the license is assigned correctly before proceeding to the next step.
1.4. Verify License Assignment:
– Once assigned, check your active licenses to confirm the Dejavoo license is listed.
– If the license does not appear, refresh the page or contact SambaPOS support.
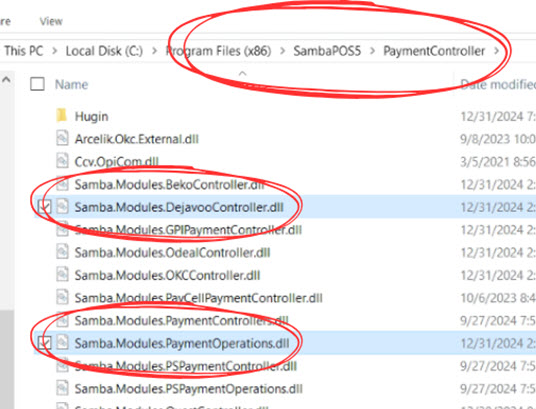
Step 2: Locate the Payment Controller Folder
2.1. Find the SambaPOS Installation Root Folder:
– The default installation location for SambaPOS is typically:
C:\Program Files\SambaPOS\
Alternatively, if a custom location was chosen during installation, find the corresponding directory (e.g., C:\SambaPOS\).
2.2. Open the Payment Controller Folder:
– In the root folder, locate and open the subfolder named Payment Controllers.
Step 3: Identify and Copy the Required DLL Files
3.1. Locate the Following Two DLL Files:
– Samba.Modules.DejavooController.dll
– Samba.Modules.PaymentOperations.dll
3.2. Verify File Names Carefully:
– Ensure you select only the two DLL files mentioned above. Selecting incorrect files may prevent SambaPOS from functioning properly.
3.3. Copy the Files:
– Highlight the two required files.
– Right-click and select Copy, or use the keyboard shortcut Ctrl+C.
Step 4: Paste the DLL Files to the Root Folder
4.1. Navigate Back to the Root Folder:
– Go back to the main SambaPOS root directory, where you initially located the Payment Controllers folder.
4.2. Paste the Files:
– Right-click in the root folder and select Paste, or use the keyboard shortcut Ctrl+V.
4.3. Critical Reminder:
– Do NOT copy any additional files from the Payment Controllers folder. Copying incorrect files may cause issues with SambaPOS loading or functionality.
Step 5: Restart SambaPOS
5.1. Close SambaPOS:
– Ensure SambaPOS is completely closed. Use Task Manager to confirm no background processes are running.
5.2. Restart SambaPOS:
– Relaunch SambaPOS to apply the changes made during the DLL file configuration.
Step 6: Obtain Dejavoo Local Settings
6.1. Log in to the ISOPays Portal:
– Open a browser and go to https://portal.ipospays.com/auth/login
– Use your credentials to log in to the portal.
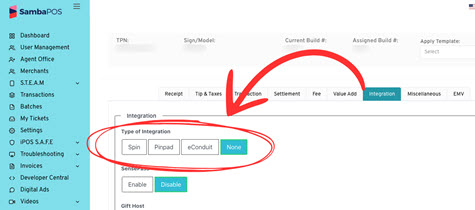
6.2. Activate Spin Cloud Mode:
– In the portal, from the left navigateion bar, go to the S.T.E.A.M..
– S.T.E.A.M. > Edit Parameters.
– Select the device from the device list.
– Once the correct device has been selected, select Edit Parameters from the list above the device’s information.
– Under Edit Parameters > Integration and turn on SPIN

6.3. Gather Required Information:
– From the ISOPays portal, collect the following credentials:
TPN (Terminal Processing Number)
Register ID
Auth Key
Step 7: Access the Dejavoo Program Module Settings in SambaPOS
7.1 Navigate to the “Manage Settings” Section:
– Open the Settings tab in the SambaPOS interface from the left-hand menu.
7.2. Open Program Settings:
– Go to Settings > Program Settings.
7.3. Locate Module Settings:
– In the Settings > Program Settings > Module Settings, find the new module settings for Dejavoo.
7.4. Confirm Availability:
– If the Dejavoo settings do not appear, recheck the DLL file placement and licensing.

Step 8: Access the Dejavoo Local Module Settings in SambaPOS
8.1. Go to the “Manage” Section:
– Return to the Settings tab in SambaPOS.
8.2. Open Local Settings:
– Navigate to Settings > Local Settings.
8.3. Access Modules:
– Within Settings >Local Settings, click on the Modules tab.
– Locate the section for Dejavoo settings.
8.4. Confirm Availability:
– If the Dejavoo settings do not appear, recheck the DLL file placement and licensing
8.5. Enter Information into SambaPOS:
– Fill in the fields with the credentials from the ISOPays portal:
– Enable Controller: Enable this option.
– Can Adjust Tip: Check this box to allow tip adjustments on the terminal.
– Can Refund: Check this box to enable refund functionality.
– TPN: Enter the terminal processing number from ISOPays.
– Register ID: Enter the register ID from ISOPays.
– Auth Key: Enter the authentication key from ISOPays.
– Logging: Enable this option if you need to track activity for debugging.
8.6. Save the Configuration:
– Double-check all fields for accuracy.
– Click Save to finalize the configuration.

Step 9: Final Checks
9.1. Perform a Test Transaction:
– Process a test transaction to verify the Dejavoo module is working as intended.
– Look for error messages or incomplete configurations.
9.2. Verify Terminal Settings in ISOPays:
– Log back into the ISOPays portal and ensure the terminal settings align with the configuration in SambaPOS.